Montessori's Moveable Alphabet is an exciting transition for many young children. In the Montessori Language sequence of lessons, children have progressed using sandpaper letters only. Once the guide presents the moveable alphabet, the children are eager to continue learning.
Below are the Montessori lessons that use the moveable alphabet. The first lesson listed below is the fourth lesson in the pink series sequence.

What is the Montessori Moveable Alphabet?
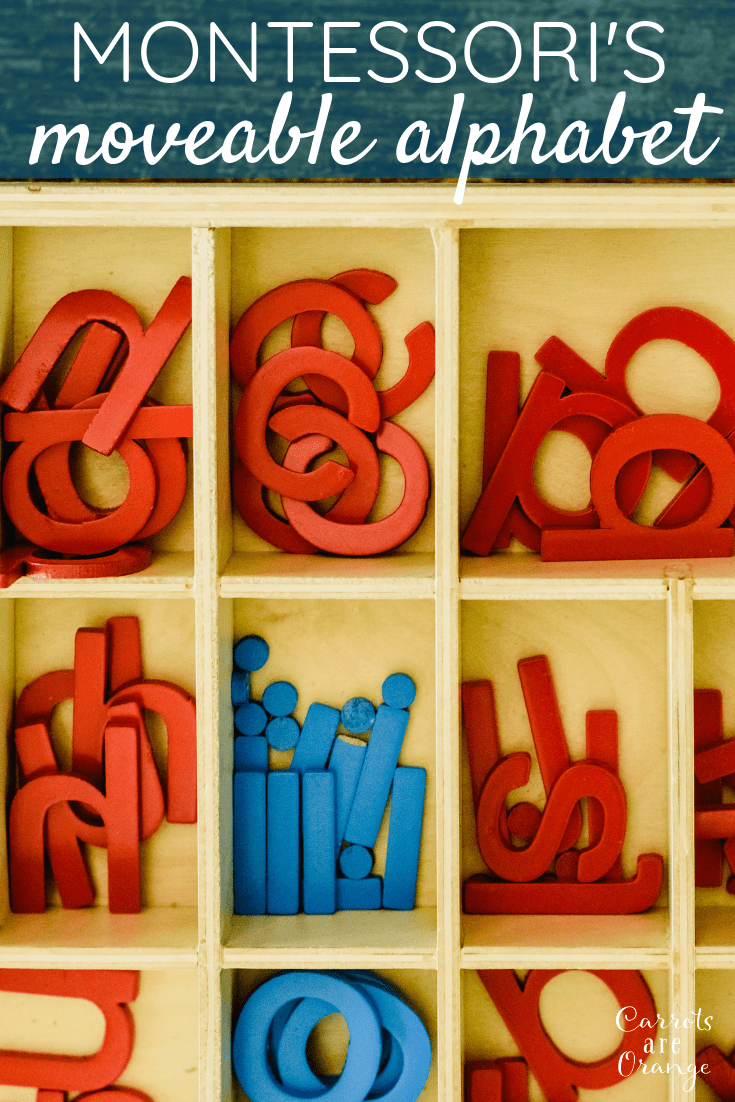
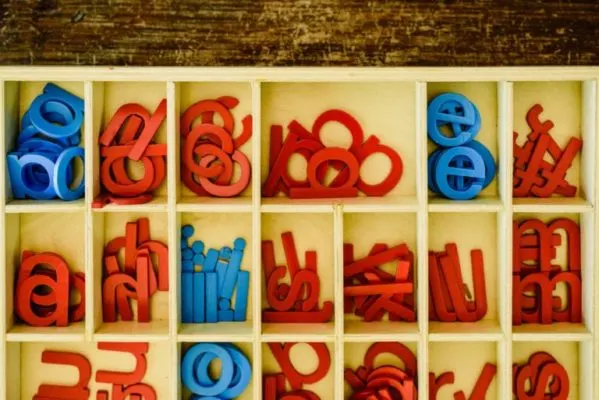
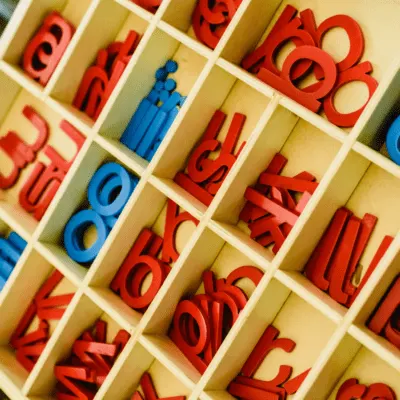
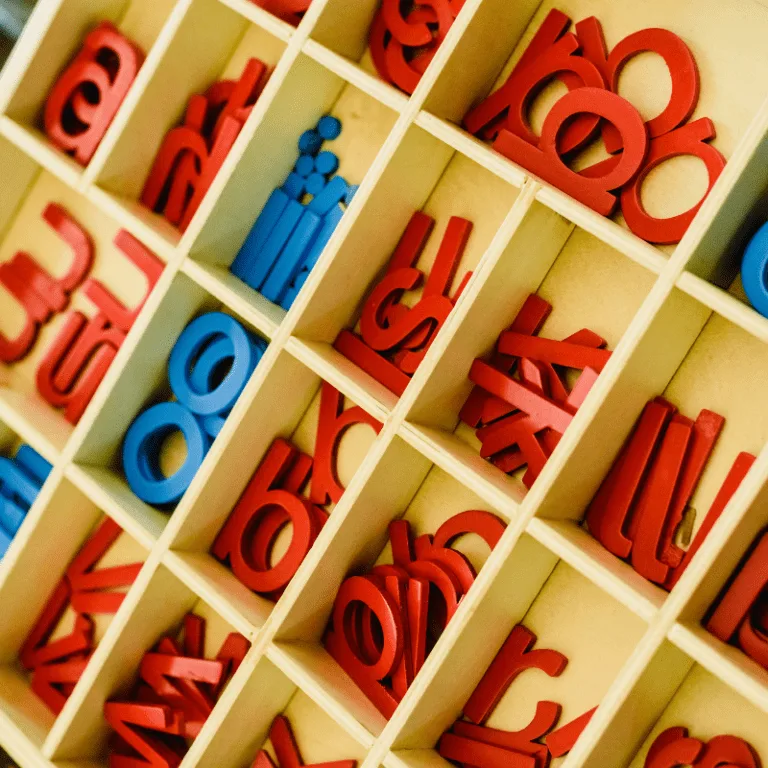
In brief, a moveable alphabet is used in a Montessori learning environment to teach reading, spelling, and writing. It is a wooden box containing 26 wooden letters. Vowels are in blue, and consonants are in red.

Using the Moveable Alphabet with Montessori Language Lessons
- Introduction to the Movable Alphabet
- Association of the Movable Alphabet and the Sandpaper Letters
- Short Vowel Word Building: Movable Alphabet and Sandpaper Letters
- Movable Alphabet: Short Vowel Words with Objects
- Movable Alphabet: Short Vowel Words with Pictures
#1 – Introduction to the Moveable Alphabet
Typically the child is 3.5 years old or older when she starts using and learning with the moveable alphabet. You know she is ready because she can recognize 3-4 consonant sounds and one vowel sound.
The goals of this lesson are to familiarize the child with the movable alphabet, to teach care of the work by being careful with the letters, and to organize & straightening letters in the box.
Present the Moveable Alphabet with this approach:
- Invite the child to do the work.
- Go to the shelf and carry the movable alphabet to the rug area.
- Invite the child to do the work.
- Go to the shelf and carry the movable alphabet to the rug area.
- Give a name to the apparatus.
- Describe the contents of the wooden box.
- Let children familiarize themselves with it.
- Demonstrate how to straighten letters in the box to see them clearly, stacking the same letters together in each compartment.
- Remove one or more letters and then return to the box.
- Use scanning, left to right.
- Return letters to proper compartments and put them back on the shelf.

The child will likely be interested in the myriad of letters available to her hands. The blue and red colors will engage her, too. She will begin to identify sounds to match the letters.
The child may also be interested in how the letters fit neatly into the box's compartments (control of error).
#2 – Association of the Movable Alphabet and the Sandpaper Letters


The next lesson in the sequence is associating this new tool, the moveable alphabet, with familiar material, the sandpaper letters. The age, readiness, and goals of this lesson are the same as when introducing the moveable alphabet.
Similarly, age 3.5 years old or older, having the ability to recognize 3-4 consonant sounds and one vowel sound, and preparation for reading, writing, and spelling. Finally, for this presentation, you need only a mat, sandpaper letters, and the moveable alphabet.

Associate the Moveable Alphabet to the Sandpaper Letters with this approach:
- Invite child
- Unroll work rug – if one is to be used
- Choose a sandpaper letter
- Find the same letter from the moveable alphabet (or can remove a few to match sandpaper letters)
- Place on or under the sandpaper letter
- Continue depending on the child's interest
- Return letters to movable alphabet box
- Use scanning, left to right
The child will be interested in matching the letters. The control of error is that the letters don't match.
Related Read: Montessori Pink Series Word Lists
#3 – Movable Alphabet & Sandpaper Letters – Short Vowel Word Building
Once the guide introduces the moveable alphabet and associates the moveable alphabet with the sandpaper letters, the child is likely a bit older, about 4 years old or so, with the exact prerequisites.
The goals of this next lesson focus on order, concentration, coordination, independence, self-esteem, and preparation for writing, reading, and spelling.
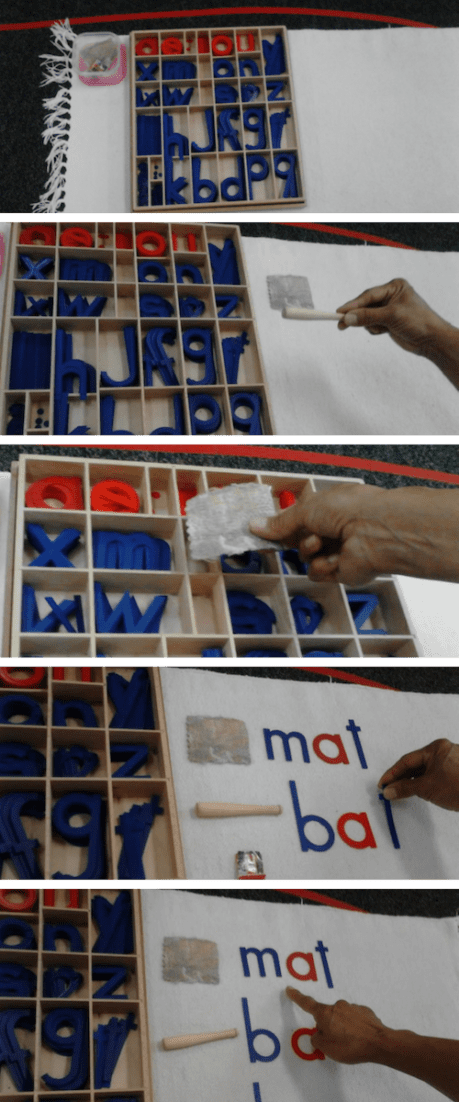
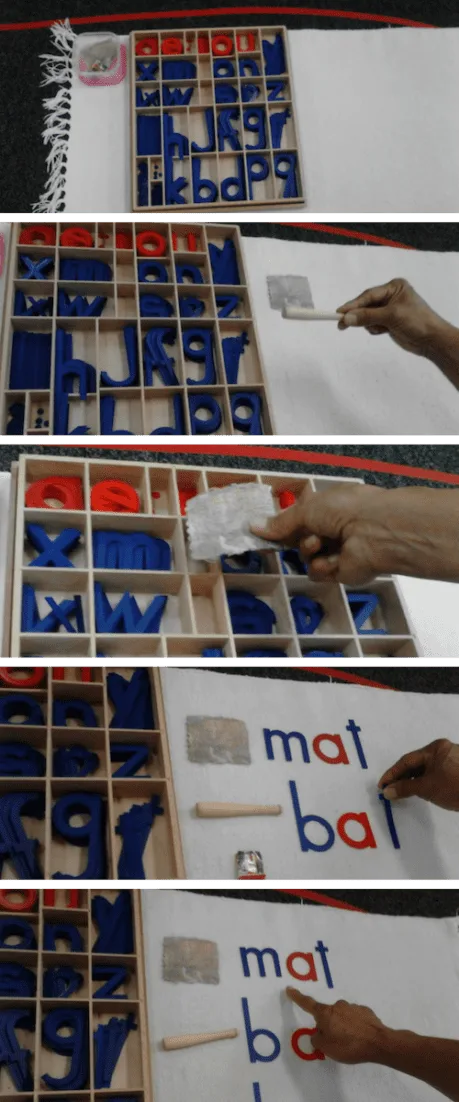
Build Short Vowel Words with the Moveable Alphabet & Sandpaper Letters with this approach:
- Bring the sandpaper letters to the rugs
- Begin with the consonant sounds and vowel sound the child knows, for example: (c, s, m, t, a)
- Form a word the child has previously read, such as “mat,” with the Sandpaper Letters.
- Introduce the Large Moveable Alphabet to the child.
- Show the child how to scan the box left to right, top to bottom with the index finger to find letters.
- Ask the child to find the corresponding letters in the Moveable Alphabet.
- Show the child how to arrange the letters of the Moveable Alphabet to form the word “mat.”
- Ask the child to read the word he has formed.
- Continue with other words, such as: “cat,” “sat,” and “rat.”
- Show the child how to return letters to proper compartments.
The child will be interested in the different colors of vowels and consonants, the sounds, blending the sounds and letters, the colors of the vowels and consonants, and fitting the letters into the respective compartments.
#4 – Movable Alphabet: Short Vowel Words with Objects
When the child is ready to move on from short vowel word building, she will tackle the next lesson on the pink series sequence. The child will create short vowel words and match objects to the words.
For this lesson, you need the following materials:
- Red & blue pencils (for writing on labels if the child is ready)
- Movable Alphabet and miniature objects whose names are phonetic, rug, work board, paper slips
- Containers of objects having the short vowel sound and the CVC pattern:
- /a/: bag, can, cap, cat, fan, pan
- /e/: bed, hen, jet, peg, pen, web
- /i/: bib, kid, lid, pig, pin, wig
- /o/: dog, fox, log, mop, pop, top, pod
- /u/: bud, bus, cup, gum, jug, tub
Similar aims as the prior lessons including:
- To begin forming and reading three-letter short vowel phonetic words
- Order
- Concentration
- Coordination
- Independence
- Self-esteem
- Analyze sounds in words
- Word building
- Preparation for reading
- Builds vocabulary
Match Short Vowel Words to Objects with this approach:
- Invite the child to work with the short vowel objects and the Moveable Alphabet.
- Show the child where the short vowel objects and the Moveable Alphabet are located on the shelf.
- Unroll work rug
- Select the container with the short /a/ objects and the Moveable Alphabet and carry them to the work rug.
- Name each object.
- The child repeats the name of each object.
- Place the container of objects (/a/: bag, can, cap, cat, fan, pan) to the upper left of the rug in a vertical column.
- Place the box of Moveable Alphabet letters to the right of the container of objects.
- Name the object: “rug.”
- Make the first sound of the object while pointing to each letter in the Moveable Alphabet box to locate the letter representing the sound and place it on the rug.
- Continue the method, isolating each sound from the word.
- Point to the object and name the object.
- Point and move the finger from left to right under the word and read the word emphasizing the sounds.
- Continue with the second object: the bat.
- Continue the process as long as the child remains interested and focused.
- When words are formed, have the child read each word out loud.
- Remember not to correct any misspelled words.
- When ready to return the material to the shelf, begin with the object at the left. Name the object and return it to the container.
- Read the word and return each letter to the appropriate compartment.
- Return the objects and Moveable Alphabet to the shelf.
The child will be interested in exploring the objects, placing the letters in a row to make a word, the colors, the sounds, associating the sound and the letter, reading the words, reading the written words, and writing the words.
#5 – Moveable Alphabet with Short Vowel Words & Pictures
Once the child masters matching the objects to short vowel words built with the moveable alphabet, he is ready to move more abstractly.
In this lesson, the child will build short vowel words with the moveable alphabet and match pictures (instead of objects) to the words.
Materials needed for this lesson include:
- Movable Alphabet and pictures whose names pencils (red and blue) are phonetic, rug, work board, paper slips,
- Containers of pictures having the short vowel sound and the pattern consonant/vowel/consonant:
- /a/: bag, can, cap, cat, fan, pan, gas, ham, jam, rag, rat, tag
- /e/: bed, hen, jet, peg, pen, web, keg, leg, men, red, ten, hem
- /i/: bib, kid, lid, pig, pin, wig, fig, fin, hip, rib, tin, lip
- /o/: dog, fox, log, mop, pod, top, cob, cot, hog, rod
- /u/: bud, bus, cup, gum, jug, tub, bun, mud, pup, rug, sun, bug
The goals for this lesson include:
- To begin forming and reading three-letter short vowel phonetic words.
- Order, concentration, coordination, independence
- Self-esteem
- Analyze sounds in words
- Word building
- Preparation for reading
- Builds vocabulary
Match Short Vowel Words to Pictures with this approach:
- Invite the child to work with the short vowel pictures and the Moveable Alphabet.
- Show the child where the short vowel pictures and the Moveable Alphabet are on the shelf.
- Unroll rug
- Select the container with the short /a/ pictures and the Moveable Alphabet and carry them to the rug.
- Place the container of pictures (/a/: bag, can, cap, cat, fan, pan) to the upper left of the rug in a vertical column.
- Place the box of Movable Alphabet letters to the right of the container of pictures.
- Name the picture: cat.
- Make the first sound of the picture while pointing to each letter in the Moveable Alphabet box to locate the letter representing the sound and place on the rug.
- Continue method, isolating each sound from the word.
- “C”, scan, remove the letter from box and place on the rug.
- “a”, scan, remove the letter from box and place on the rug. Place the letter to the right of the first letter.
- “t”, scan, remove the letter from box and place on the rug. Place the letter to the right of the second letter. Note: Letters can be pre-selected and laid randomly on the bottom of the rug.
- Point to the picture and name the picture.
- Point and move the finger from left to right under the word and read the word emphasizing the sounds of the word.
- Continue with the second picture: can.
- Continue the process as long as the child remains interested and focused.
- When ready to return the material to the shelf, begin with the object at the left. Name the object and return it to the container.
- Read the word and return each letter to the appropriate compartment.
- Return the objects and Moveable Alphabet to the shelf.
Resources Used in These Moveable Alphabet Lessons
- Wooden Box Moveable Alphabet
- Original Sandpaper Letters
- Small Objects for Language Learning
- Padded Blank Labels
- My Favorite Colored Pencils
- Work Rug
The next lesson in the sequence is associating this new tool, the moveable alphabet, with familiar material, the sandpaper letters. The age, readiness, and goals of this lesson are the same as when introducing the moveable alphabet.
Similarly, age 3.5 years old or older, having the ability to recognize 3-4 consonant sounds and one vowel sound, and preparation for reading, writing, and spelling. Finally, for this presentation, you need only a mat, sandpaper letters, and the moveable alphabet.


Associate the Moveable Alphabet to the Sandpaper Letters with this approach:
- Invite child
- Unroll rug – if one is to be used
- Choose a sandpaper letter
- Find the same letter from the moveable alphabet (or can remove a few to match sandpaper letters)
- Place on or under the sandpaper letter
- Continue depending on the child's interest
- Return letters to a movable alphabet box
- Use scanning, left to right
The child will be interested in matching the letters. The control of error is that the letters don't match.
Related Read: Montessori Pink Series Word Lists
#3 – Movable Alphabet & Sandpaper Letters – Short Vowel Word Building
Once the guide introduces the moveable alphabet and associates the moveable alphabet with the sandpaper letters, the child is likely a bit older, about 4 years old or so, with the exact prerequisites. The goals of this next lesson focus on order, concentration, coordination, independence, self-esteem, and preparation for writing, reading, and spelling.
Build Short Vowel Words with the Moveable Alphabet & Sandpaper Letters with this approach:
- Bring the sandpaper letters to the rugs
- Begin with the consonant sounds and vowel sound the child knows, for example: (c, s, m, t, a)
- Form a word the child has previously read, such as “mat,” with the Sandpaper Letters.
- Introduce the Large Moveable Alphabet to the child.
- Show the child how to scan the box left to right, top to bottom with the index finger to find letters.
- Ask the child to find the corresponding letters in the Moveable Alphabet.
- Show the child how to arrange the letters of the Movable Alphabet to form the word “mat.”
- Ask the child to read the word he has formed.
- Continue with other words, such as: “cat,” “sat,” and “rat.”
- Show the child how to return letters to proper compartments.
The child will be interested in the different colors of vowels and consonants, the sounds, blending the sounds and letters, the colors of the vowels and consonants, and fitting the letters into the respective compartments.
#4 – Movable Alphabet: Short Vowel Words with Objects
When the child is ready to move on from short vowel word building, she will tackle the next lesson on the pink series sequence. The child will create short vowel words and match objects to the words.
For this lesson, you need the following materials:
- Red & blue pencils (for writing on labels if the child is ready)
- Movable Alphabet and objects whose names are phonetic, rug, work board, paper slips
- Containers of objects having the short vowel sound and the CVC pattern:
- /a/: bag, can, cap, cat, fan, pan
- /e/: bed, hen, jet, peg, pen, web
- /i/: bib, kid, lid, pig, pin, wig
- /o/: dog, fox, log, mop, pop, top, pod
- /u/: bud, bus, cup, gum, jug, tub
Similar aims as the prior lessons include:
- To begin forming and reading three-letter short vowel phonetic words
- Order
- Concentration
- Coordination
- Independence
- Self-esteem
- Analyze sounds in words
- Word building
- Preparation for reading
- Builds vocabulary
Match Short Vowel Words to Objects with this approach:
- Invite the child to work with the short vowel objects and the Moveable Alphabet.
- Show the child where the short vowel objects and the Moveable Alphabet are located on the shelf.
- Unroll rug
- Select the container with the short /a/ objects and the Moveable Alphabet and carry them to the rug.
- Name each object.
- The child repeats the name of each object.
- Place the container of objects (/a/: bag, can, cap, cat, fan, pan) to the upper left of the rug in a vertical column.
- Place the box of Moveable Alphabet letters to the right of the container of objects.
- Name the object: “rug.”
- Make the first sound of the object while pointing to each letter in the Moveable Alphabet box to locate the letter representing the sound and place it on the rug.
- Continue the method, isolating each sound from the word.
- Point to the object and name the object.
- Point and move the finger from left to right under the word and read the word emphasizing the sounds.
- Continue with the second object: the bat.
- Continue the process as long as the child remains interested and focused.
- When words are formed, have the child read each word out loud.
- Remember not to correct any misspelled words.
- When ready to return the material to the shelf, begin with the object at the left. Name the object and return it to the container.
- Read the word and return each letter to the appropriate compartment.
- Return the objects and Moveable Alphabet to the shelf.
The child will be interested in exploring the objects, placing the letters in a row to make a word, the colors, the sounds, associating the sound and the letter, reading the words, reading the written words, and writing the words.
#5 – Moveable Alphabet with Short Vowel Words & Pictures
Once the child masters matching the objects to short vowel words built with the moveable alphabet, he is ready to move more abstractly. In this lesson, the child will build short vowel words with the moveable alphabet and match pictures (instead of objects) to the words.
Materials needed for this lesson include:
- Movable Alphabet and pictures whose names pencils (red and blue) are phonetic, rug, work board, paper slips,
- Containers of pictures having the short vowel sound and the pattern consonant/vowel/consonant:
- /a/: bag, can, cap, cat, fan, pan, gas, ham, jam, rag, rat, tag
- /e/: bed, hen, jet, peg, pen, web, keg, leg, men, red, ten, hem
- /i/: bib, kid, lid, pig, pin, wig, fig, fin, hip, rib, tin, lip
- /o/: dog, fox, log, mop, pod, top, cob, cot, hog, rod
- /u/: bud, bus, cup, gum, jug, tub, bun, mud, pup, rug, sun, bug
The goals for this lesson include:
- To begin forming and reading three-letter short vowel phonetic words.
- Order, concentration, coordination, independence
- Self-esteem
- Analyze sounds in words
- Word building
- Preparation for reading
- Builds vocabulary
Match Short Vowel Words to Pictures with this approach:
- Invite the child to work with the short vowel pictures and the Moveable Alphabet.
- Show the child where the short vowel pictures and the Moveable Alphabet are on the shelf.
- Unroll rug
- Select the container with the short /a/ pictures and the Moveable Alphabet and carry them to the rug.
- Place the container of pictures (/a/: bag, can, cap, cat, fan, pan) to the upper left of the rug in a vertical column.
- Place the box of Movable Alphabet letters to the right of the container of pictures.
- Name the picture: cat.
- Make the first sound of the picture while pointing to each letter in the Moveable Alphabet box to locate the letter representing the sound and place on the rug.
- Continue method, isolating each sound from the word.
- “C”, scan, remove the letter from box and place on the rug.
- “a”, scan, remove the letter from box and place on the rug. Place the letter to the right of the first letter.
- “t”, scan, remove the letter from box and place on the rug. Place the letter to the right of the second letter. Note: Letters can be pre-selected and laid randomly on the bottom of the rug.
- Point to the picture and name the picture.
- Point and move the finger from left to right under the word and read the word emphasizing the sounds of the word.
- Continue with the second picture: can.
- Continue the process as long as the child remains interested and focused.
- When ready to return the material to the shelf, begin with the object at the left. Name the object and return it to the container.
- Read the word and return each letter to the appropriate compartment.
- Return the objects and Moveable Alphabet to the shelf.
Resources Used in These Moveable Alphabet Lessons
- Wooden Box Moveable Alphabet
- Original Sandpaper Letters
- Small Objects for Language Learning
- Padded Blank Labels
- My Favorite Colored Pencils
- Work Rug
Related Read: All You Need for an Easy Sandpaper Letters Lesson